A proof of service is the document that tells the court when, where, and how papers were delivered. It can take different forms. An affidavit of service is sworn, usually in front of a notary. A declaration of service is signed under penalty of perjury and, where the court allows it, does not need a notary. The Mighty Affidavit Generator builds it for you from the job details and service attempts you have already entered. The Affidavit Generator is included on the Free plan.
> Important: Creating an affidavit is paperwork. It does not serve anyone. Only create and sign an affidavit after service has actually been completed (or, for a non-service declaration, after your attempts were actually made), and make sure everything in it is true.
Before you start
- Open a job that has its service attempts logged, including the date, time, result, and notes for each attempt.
- Know which court the case is in and which state the service took place in.
- Have your signature ready, and a notary if your form needs one.
Step 1: Open the job
- Click My Jobs in the left menu.
- For a real job, open the job containing your actual service records. The screenshots use the fictional Hollywood v. Chris Kringle training job; do not sign or send an affidavit for that demo.
Step 2: Open the Affidavit Generator
- On the job page, find the Job Timeline and click Affidavit.
- The Affidavit Generator opens full screen. At the top you will see the job ID, its status and priority, the person served, and how many attempts are logged.
Step 3: Choose the right template for your jurisdiction
- Look at Global Templates on the left. The jurisdiction is picked for you from the job's service address, and the list is filtered to match.
- Check the note at the top of the preview. When a template is chosen for you, it explains why, for example that it matches the uploaded documents and the state. You can pick a different template any time.
- To see other options, use the jurisdiction dropdown above the list. You can choose All states, Nationwide, International, Federal, or a specific state. You can also type in Search templates.
- Click the template that fits your court, your case type, and how service was made. Choices include declarations of service, affidavits with a notary attachment, state forms such as California's Proof of Service of Summons, and due diligence declarations for when service could not be completed.
If you already chose a form on the Review & Verify step when you created the job, it is preselected for you. Templates you save yourself appear under My Templates.
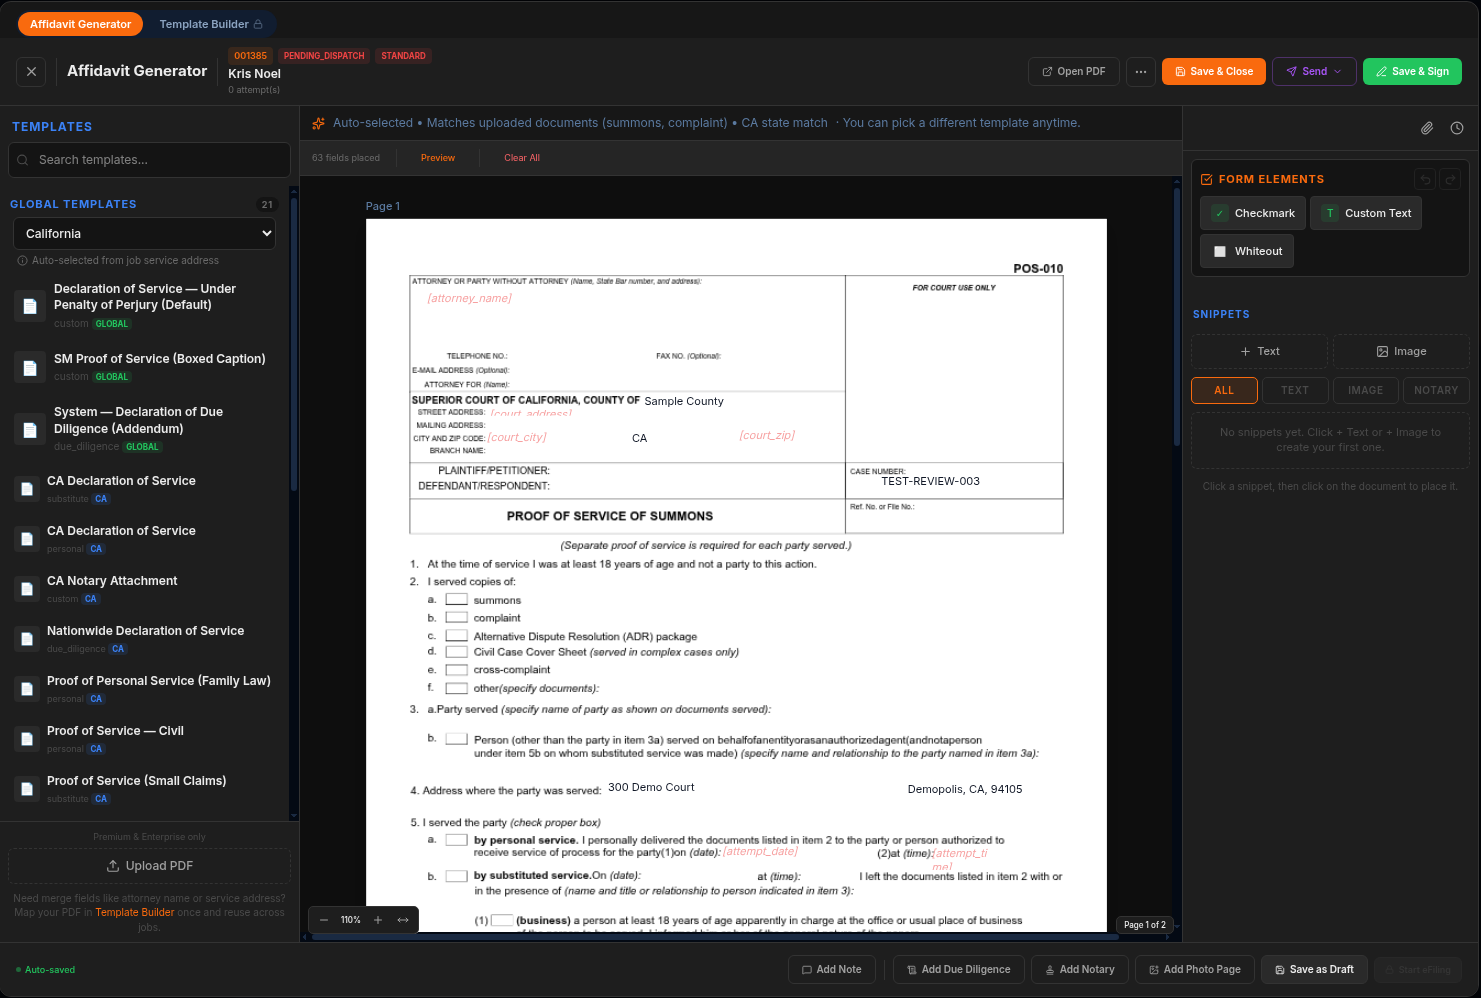
The Affidavit Generator for a sample job. California was picked from the sample service address.
> Check your court's rules: Courts and states have their own requirements, and a form that works in one place may not be accepted in another. Confirm that the form you choose is the right one for your court before you file. This guide is not legal advice.
Step 4: Review the filled-in details
The generator fills in details such as the party names, case number, court, and service address from the job, right on the form preview.
- Read every field on the preview carefully against the documents and your attempt notes. Click Open PDF to look at the full document.
- Fill in anything still missing. Use Form Elements on the right to add a Checkmark, Custom Text, or Whiteout, and Snippets to place saved text or images.
- Use the buttons along the bottom if your affidavit needs more: Add Note, Add Due Diligence, Add Notary, or Add Photo Page.
- If a detail is wrong on the job itself, such as a misspelled name, correct it on the job so it stays right everywhere.
- Make sure the description of how service was made matches what really happened. Click Save as Draft if you need to come back later.
Step 5: Sign, or send for signature
- If you are the server and everything is correct, click Save & Sign.
- If someone else needs to sign, click Send. Signing links expire after about 72 hours, so send a new one if it runs out.
- To finish later, click Save & Close.
Step 6: Complete any notarization and file it
- If your form needs a notary, sign in front of a notary as your state requires.
- File or deliver the finished affidavit the way your court or customer requires.
You did it
You have created your account, set up your organization, created a job, and generated an affidavit. Welcome to Mighty Process Server.
- Read up on process server laws by state.
- Questions? Visit the Help Center and FAQs or email support@mightyprocessserver.com.